
The various reports in Merchant Direct are dynamic, and can be filtered and sorted in real time. Click on the links below to learn how to:
Apply filters to report results
Sort the report results
Filters are a way to exclude certain information from report results; it allows you to view only the information you want to view while hiding results that you do not wish to see. You can apply as many filters as you want to a report, but note:
you can only apply one filter at a time to a column.
the more filters you apply, the smaller your pool of results will be.
NOTE: Filters that you apply to a report do not carry over into an exported report. The filters you apply will only be applicable to a report being viewed within Merchant Direct. Exported reports will contain all fields and all data within the requested date range.
Follow the instructions below to filter the report results.
Run the report.
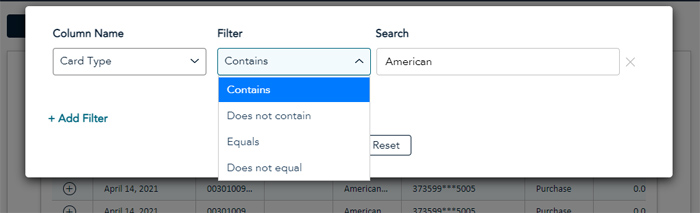
Once the report results are visible on the screen, click the Table Filter button. A popup appears.
Click the Column Name drop-down menu and select the column by which you'd like to filter.
Click the Filter drop-down menu and select the filter type you'd like to apply. Refer to the Filter types section below for guidelines about filter types.
Click inside the Search field and type in the search term you'd like to search by. Refer to the Search terms section below for guidelines about entering search terms.
If you wish to use additional filters, proceed to step 7. If you are satisfied with the filter you have entered, proceed to step 9.
Click the Add Filter link in the bottom left corner of the popup. A new line of filters is added.
Repeat steps 3-5 to set the filter (Column Name, Filter, and Search).
Once all your filters are set, click the Apply button.
The report reappears with the filters applied.
There are 5 filter types in the report filtering tool. Refer to the table below to determine the appropriate filter type to select.
|
Choose this filter type... |
If you want to... |
|
Contains |
search for results that contain all or part of a phrase, or all or part of a string of numbers. For example, if you want to search for the last 4 digits of a card number used, you could filter the "Cardholder Number > Contains > 8901". |
|
Does not contain |
search for results that does not contain any part of a phrase or a string of numbers. For example, if you wanted to search for transactions done by all clerks except for clerk 008, you could filter "Clerk ID > Does not contain > 008". |
|
Equals |
search for results that are an exact match of your search term. For example, if you wanted to search for all transactions paid by Visa only, you could filter "Card Type > Equals > Visa". |
|
Does not equal |
exclude results that are an exact match of your search term. For example, if you wished to search for all transactions that are not $5.00, you could filter "Merchant Settled Transaction Amount > Does not equal > $5.00". |
|
In between |
search for dates in a date range. For example, if you wanted to see all declined transactions between June 1 and June 30, you could filter "Transaction Date > In between > June 01, 2021 > June 30, 2021" and "Transaction Response > Equals > Declined". |
When entering your search terms in the Search field, please be aware of the following conditions:
If you are searching for a text or numeric string using the Contains or Does not contain filter, you can use part of a word. For example, if you wish to find MasterCard® as the card type, you can simply type in "mast"
If you are searching for an exact term using the Equals or Does not equal filter, you need to spell your search term exactly. For example, if you are searching for a transaction with $52.68 as the Merchant Settled Transaction Amount, you would need to enter "52.68" exactly.
It may be possible that your search terms and filters may not return results. Check the report date and the filters and search terms used. You can click the Reset Table Filter link to reset your filters and start again without needing to rerun the report.
The report results that appear in columns can be sorted alphabetically, chronologically, or numerically. When you sort the report by a column, the results in other columns also re-sort and appear in the new sort order.
Simply click on the column header you wish to sort by.
The report results will render sorted in ascending order by the data in the column header you clicked.
If you wish to sort in descending order, click the same column header again. The report results will render sorted in descending order.
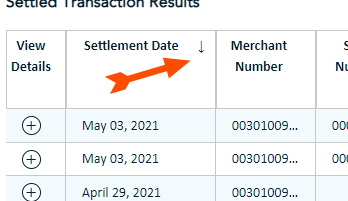
Refer to the diagram below to see an example of data sorted in ascending and descending order.
 |
 |
|
Report results sorted in descending order by the Settlement Date column. |
Report results sorted in ascending order by the Settlement Date column. |
A few notes about sorted report results:
The sorting only applies to the report you are viewing; any filtering you do to one report does not automatically apply to other reports available in the system.
If you close the report and then return to it at a later time, the report reappears in its default configuration (it is unsorted).
If you wish to sort by a different column, simply click the column header, and the report results will render sorted by the new column.
Any sorting that you have done will not be applied when exporting the report to CSV.